loop subdivision surfaces
December 12th, 2006 by BramzI’ve implemented subdivision surfaces for the TriangleMesh using the Loop’s scheme. Triangles are split in four, and the vertices are weighted using masks to produce a smoother surface. This process is repeated a few times, indicated by the subdivision level.
The implementation also supports the concept of creases. If an edge of the mesh has a crease level different than zero, the subdivision must leave the edge sharp for a number of iterations equal to the crease level. For example, if an edge has crease level three, and a subdivision of five levels is applied, then the algorithm must leave the edge sharp for the first three iterations, and may only smooth it for the last two. This will give the edge a sharper appearance than the rest of the mesh. If the crease level is equal or greater than the subdivision level (for example both level five), then the edge will stay ultra sharp, since the algorithm will never be allowed to smooth it.
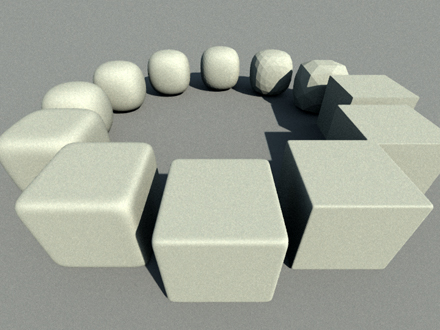
In the following image, the same cube is shown for different subdivision and crease levels. There are no vertex normals used, to clearly show the different faces of each resulting triangle mesh. So no sneaky normal interpolation to give the mesh a smooth appearance!

At three o’clock, there’s a perfect cube with subdivison level zero. Going in counterclockwise order, the subdivision is each time increased by one level. At nine o’clock, subdivision level six is reached, resulting in a very smooth object. Remember there are no vertex normals here!
Continuing in counterclockwise order, the subdivision level is now kept at constant of six, but the crease level of the cube’s edges is each time increased by one. The circle would be closed again at three o’clock with both the subdivision and creasing at level six, but this is virtually the same as the original cube (both at level zero), only with a much finer triangle mesh.
You can try all this for yourself using the example loop_subdivision.py in the examples/scenery subdirectory.
PS: you will have to update your Lass installation to use this, since the actual subdivision code is part of Lass.
January 3rd, 2007 at 3:32 pm
Oh man, subdivision surfaces. Those are very cool. How does UV mapping work for them? I wonder if you could apply the same subdivision algorithm to texture coordinates as for vertex coordinates…then you could automatically generate a UV mapping for the subdiv surface from a UV map on the control mesh.
You’re making a heck of a lot more progress with your raytracer than I am! (I’m off school now for the winter break, but haven’t done much programming – been watching too much TV!)
January 4th, 2007 at 2:56 am
Hi Nathan!
Yeah, well, subdivision surfaces. I’ve implemented them to render a formula 1 car that needed some smoothing – especially the wheels. But unfortunately, UV mapping is not as straight forward as I thought. Until now, I simply split the texture coordinates over the four new triangles, splitting in half over the edges. But that doesn’t quite work. It completely messes up the texture mapping. Well, it was a bit to be expected of course. So, I’ll have to find some more clever way to do it. Probably something along the same line as the vertex coordinates. But one thing that is worrying me is what to do if the texture mapping has seams over the model: when there’s a discontinuity in the texture coordinates, but not in the “observed texture”. To be continued =)
Bramz